Vertaal met Google

2012/01/20


DIY Gravel Cleaner

The nano aquarium is up and running for a few weeks now. It was only running for a week until I realised I needed a gravel cleaner. Why? Because I need to take water out of the tank for a weekly refresh, I want to clean the gravel, but I don't want to suck it up with the hose!!!

I soon found out there are specialised articles on the market for these types of tanks, but also that they are well overpriced. I decided to use some of the leftovers to build a DIY Gravel Cleaner after the idea of JBL, found here. (Nice thing about it is that it is square so it can reach the corners of the tank easily)

Here are the steps I took:
  • Take some PVC, e.g. electrical pipe, some tubing of roughly the same diameter and make sure to have some tie-wraps and teflon-tape or plumbers-tape ready
  • Take a small (transparent) square container left over after the contents have run out. I used a soap-container in my example. I would not recommend to use something that stored any more serious chemicals
  • Clean out the container REALLY thoroughly as shrimps will die if you don't!!!
  • Cut out the bottom of the container with a stanley knife
  • Bend the PVC pipe in a 90 degree angle to form an L-shape, such that it feeds the hose away from the tank 
  • Insert the PVC pipe into the fill-cap of the container. If it doesn't fit, use the plumbers-tape to create a tight fit and secure it with a tie-wrap
  • Fit the hose over the other end of the PVC tube by heating it in hot water, lubricating it with some soap and stretching it over the PVC pipe. Cool it down in order to quickly shrink it and secure it with a tie-wrap
  • Do some cleaning again to make sure any leftovers of soap are gone!
Your end-result, with all freedom for own interpretations in sizes and shapes, may look something like this:


Usage:
Obviously, this tool is used to take water out of the tank, have enough suction power to take away dirt while keeping the gravel in the tank. Here is a quick how to:
  • Place a bucket on the floor near the tank
  • Put the gravel cleaner in the tank (make sure there are no curious shrimps in it)
  • Suck up some water from the other side of the hose (don't worry, you won't die of a little water and you will get better at it)
  • Now quickly put that end of the hose in the bucket when pressure builds up
  • If you have a large diameter hose, like I do, squeeze it to control the flow and keep the gravel inside the tank
  • To stop the flow, just pull the cleaner out of the aquarium
Tips:
  • I actually use the same hose, but in reverse, for filling the aquarium
  • The larger the difference in heights between the bucket and the tank, the higher the flow-rate
Have fun using this cheap solution to great aquarium cleaning!

2012/01/08

By now all the preperations were done: 

  • Buying stuff for the tank & planning
  • Building the filter and outflow
  • Testing the tank & filter
  • Running for 1 week to test for any flaws and allow toxics to dissolve
  • Running for 1 week again with plants inside to allow the filter bacteria to start working
So.. It's Shrimptime!

I had already made up my mind on the Shortlist of Shrimps:
Given my criteria (no heating & low maintenance) I decided to go for the Red Fire Shrimp. It's said to be a real shrimp for starters -- Yes I am a complete noob at shrimps. As a noob I have no interest in buying expensive shrimps that die in no-time due to my bad shrimpkeeping capabilities. I found that these shrimps can be found both in pet shops -- all 4 species can be found at superb local pet store heems.nl, but come with a price -- but also at breeders all over the country that offer more generous prices. 

I found a semi-professional breeder at marktplaats.nl, the Dutch equivalent of ebay. She made me a good offer for only €10,- for 'about' 10 shrimps. She was really nice and I ended up with about 20 shrimps of varying sizes and (unfortunately) also varying shades of red. 

I also bought some food at her 'attic-store' for €5,-. The food consists of tabs that sink. There's a red color and a green color, I presume with slightly different ingredients. I use one every week and alternate colors. The food smells like typical rabbit food to me...is that strange?

I took the shrimps home in a small plastic tray provided by the lady. She included some plastic foil for the shrimps to hold onto on the road. I honestly believe it works for them to keep their stress levels normal. They were all clumped onto the piece of foil when we got home. 

I introduced the shrimp to the aquarium slowly and the same day they were happily walking, swimming and foraging around!!! It really is great fun to look at and these little animals are absolutely fascinating!!

Pictures:

Shrimp on the end of a valisneria leaf 
Shrimp on the filter, where they are often to be found!
A shrimp-shell: a good sign for shrimp keepers!
Two shrimp eating a 'red pill'
An yes, we have a pregnant shrimp already!


2012/01/06

Time for plants!


I decided to do some reading on plants that were nice to look at but low maintenance. I found your typical starter-aquarium-plants lined up on this site: Hobbykwekers. I also watched out for plants that didn't need additional heating so much and little light (more on that later).


Since my aquarium turns out to be much smaller, I needed to do some compromises.


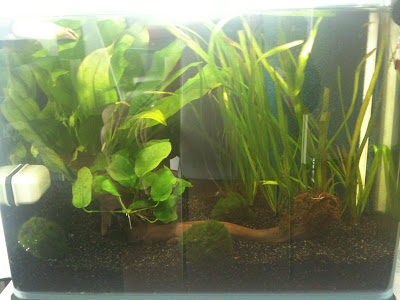
  • Valisneria to cover the front of the filter, I knew that upfront so that was a no-brainer
  • Echinodorus Bleheri -- said to be a touch plant and quite a space-filler
  • Anubias Nana -- a tough cooky again and instead of the Windelow that is suggested on the Hobbykwekers site. I wanted it attached to wood as well
  • A Moss Ball (or 2) -- it is said they can't be missed in a shrimptank
  • Some decorative Java moss that I wanted to attach to wood as well. Great info can be found here: Aquamoss
In addition, I bought a piece of wood and some fishing-line (thinnest available) to attach the plants to the wood. To start everything up, I included some fertilizer balls as well. 

It took a bit of time to wash away all the wool & plastics that the plants are grown on. It is well worth it though, as it gives you a good look at the plants you bought -- you probably bought a couple bound together. This has shown me that I had plenty of valisneria, two pieces of anubias and an almost-double echinodorus. 

I put the Echinodorus in the back, and carefully planted a row of valisneria in front of the filter. In the meantime I had cooked the wood through and through and messed up a pan as well. I then started to bind the Anubias plants and Java moss to the wood. I arranged it all, put the moss balls in place and filled it up with water carefully. 

The first time it is easy to fill the tank 'in reverse' by filling it up through the filter. It then flows slowly into the tank, instead of messing up your landscape. I don't recommend doing that later, as you will flush all your filters bacteria and rubbish through your tank... (trust me, I can tell how it looks). 

Too bad.. the piece of wood showed a strange fungus or something slimy after a few days. I took it out, detached the plants and kept them separately. I cleaned the wood in a salt-solution on advice of the pet-shop and tried it again. It didn't work and the smell was aweful! Luckily the guys at the petshop were kind enough to replace the wood. 

This is the look, still a bit 'newish' looking: